Information is given below on the following types of planting:
- Notch planting of bare-root plants
- Planting cell-grown plants
- Pit planting of bare-root plants
- Planting container-grown plants
- Direct planting of cuttings and sets
Note the following general rules:
- The roots of bare-root plants must be kept moist and covered at all times. Exposing the roots for only a few minutes can damage the fine root hairs, and reduce the plant’s chance of survival. Keep the plants in the planting bag until the moment you are ready for planting.
- Don’t dig holes or notches until the day of planting, or they are likely to fill with water. normally it’s best to dig the notch and plant the tree in one operation, but when working with groups of young school children for example, it may be more efficient if adults dig the notches and the children plant the trees.
- Don’t soak or dip the roots of bare-root plants into water before you plant. This can damage the fine root hairs and nodules by washing off the protective layer of soil particles. Soaking young trees in water as a way of alleviating root damage from drying should never be needed, as the situation should not arise. If the plants arrive with dry roots, advise the nursery immediately. The damage caused to roots by loss of moisture is anyway not reversed by rewetting. An exception to this rule is if you are using a mycorrhizal or other root dip, which is used just before planting, and coats the damp root hairs with a fine gel.
- Watering the tree immediately after planting, even with a small amount of water, is beneficial. if possible use about a bucketful per plant.
- The planting notches or holes must be big enough to take the roots, so no roots are bent or broken. The main roots stay in the position in which they are planted, so make sure they are spread evenly, and are not cramped or bent.
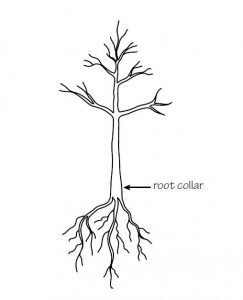
- A bare-root plant should be put in to the same depth as it was growing previously, as shown by the soil mark on the root collar. If not planted deep enough, the plant will be poorly anchored with roots exposed. Planting too deeply may cause the base of the stem to rot.
- The stems should be vertical to encourage well-balanced growth with a strong, upright base to the stem. If vertical the young trees are also more readily visible so reducing the chance of them being trodden on or omitted during weeding operations.
- After planting, tread firmly and carefully around the young plant to securely anchor the roots. Take care not to scrape the bark with your boot, and in clay soils don’t stamp so hard that you make a depression around the stem, as this will tend to collect water and cause the stem to rot.
- Check for firmness by gently pulling on the stem, and the plant should not loosen. All the plants should be checked again at least once in the three or four weeks after planting, and firmed in again as necessary. also check after heavy winds or frosts, and again just before the plants come into growth in the spring.

Protect and weed the trees after planting (see also Chapter 7 – Aftercare).
Notch planting
Notch planting is usually the best method for young bare- root trees on most sites. Stock with very spreading roots may need to be pit planted, or a ‘hybrid’ system may be appropriate. Trees should not be notch planted direct into heavy clay soils without previous soil preparation.
The planting notch is best made with a heavy, straight bladed garden spade, or a special planting spade (see Chapter 4 – Safety, equipment and organisation).
The basic method is very simple. Push the blade into the ground and then use a backwards and forwards movement to open a notch as shown. Then with a sideways, wiping motion, slide the plant into position and pull it upwards slightly to spread the roots. Then tread firmly and carefully around the stem to close the notch.

Don’t push the plant straight down or you will bend the roots upwards and probably break some of them.
You may need to adjust the depth of the notch according to the length of the roots. Don’t make a deeper notch than necessary, as even if you close the notch at the surface, you may leave an air pocket in which the roots are suspended and dry out.
Except for very small plants, you should make two cuts in different directions, following a ‘T’ plan as shown. This breaks up a larger volume of soil below the surface, giving space to spread the roots.

Planting in grass
In general when planting into fertile grassland, much the best way is to plant direct into the grass sward, and then after planting, kill off an area 1m square around each tree with herbicide or plastic sheet mulch, and maintain it as a weed-free area. If the whole sward is killed off by herbicide or cultivated before the trees are planted, there will be a strong growth of weeds which will be much more difficult to control than the original grass sward.
If you are going to use a herbicide after tree planting, the notch can be made straight into the turf. The cut can be easily made through short or sparse turf, and in crumbly soil the turf can be quite helpful in stopping the notch collapsing as you dig.
it is more difficult to make the slits through long, tough grass, as the blade will not cut through so easily. Consider mowing the grass in the late summer before planting, so that you start with short turf. If you are planning to use herbicide, spraying is also easier and more effective on short, new grass than on longer, older growth.
If it’s too difficult to cut through the turf, you may need to remove a couple of turves at the planting position, and plant into the bare ground (called screef planting). Depending on how they come up, the turves can either be broken up and discarded, or laid grass side down around the planted tree. In damper ground, a thick turf can be removed and inverted, and the tree is then planted into the turf (called turf planting). This gives a better drained planting position to improve root growth and survival. The inverted turves are not effective as a method of weed control, and herbicide or mulches will be needed.

If you don’t want to use either herbicide or mulch for weed control, you will need to start with a generous weed-free area, and maintain it by hand weeding or hoeing. An area with sides equivalent to four spades width is not too big, although it may look so when you plant! you must weed. Even if you mow the grass around the planting square, by mid-summer it will have partly grown over with grass or been invaded with other weeds, adversely affecting tree growth and survival. This method of weed control is not generally recommended, as it is easy to damage the stem or roots of the tree when using a hoe or fork.

If planting individual or small groups of trees in parks, gardens or school grounds which have existing shrub beds or borders, plant the trees in the beds rather than in the grass, as they will establish much more quickly. As required, it is easy to convert beds to grass or vice versa once the trees are established.
Planting in machine cultivated ground
Where heavy clay soils have been ploughed to reduce compaction, ridges will be formed. Planting trees on the ridges will normally be beneficial as this provides a better drained planting position.
Where compacted ground has been loosened by ripping or subsoiling, it’s usually best not to plant along the rip line, as this tends to open up in dry weather. Although it’s tempting to use the rip line as a ready-made planting line, it’s usually best to make new notches between the rip lines.
Cell-grown plants
Cell-grown plants are grown in special small containers designed for tree seedlings, which promote good root growth without ‘spiralling’. They can be planted earlier in the autumn than bare-root stock, and can establish without check and make late autumn root growth. Compared to bare-root stock, the use of cell-grown plants therefore reduces the pressure to get all planting done in the late autumn/early winter period. In early autumn the days are longer, and the weather and ground conditions are usually better than later in the year, making the job more pleasant, and causing less damage to the ground. Cell-grown plants should be planted well before bud-burst in spring, to allow roots to grow into the surrounding soil before water is lost through the new foliage. The best time to plant is September. Cell-grown trees can be planted between July and October, but planting in the earlier months will normally require regular watering.
Due to the lack of check at planting, the relative height growth of cell-grown plants is better than bare-root stock in the year following planting.
Various sizes of cell are produced, to suit various species and uses.
Cell-grown plants are best planted as soon as possible after delivery, to save possible deterioration during storage. Immediately on delivery, they should be stored outside in a sheltered position. If trees are in leaf and planting is delayed, regular checks must be made to ensure that the root plugs are kept moist. The supplier will give advice on storage and watering, as this will vary according to the method of packing.
Note the following:
Cell-grown plants can be planted with an ordinary spade, but a special tool called a ‘spear ’ makes planting easier and quicker.
- Whatever tool is used, the top of the cell or plug must be at least 12mm (half an inch) below the soil surface, and covered with soil. If it’s exposed, the compost in the cell dries out and does not easily re-wet.
- Various plant boxes and carriers are available from suppliers of cell-grown plants, to ease the job of planting.
- In heavy clays, cell-grown plants should not be planted without previous soil preparation, such as deep cultivation or ripping.
Specialist tools for planting cell-grown plants are like spades, but instead of a blade have a ‘spear’, which makes a hole of the correct size for planting. They can be used in any soil except very sandy soil, and can be used to penetrate stony ground. In clay soils a twisting motion should be used to tear the side of the hole, as otherwise ‘smeared’ sides can be formed which are difficult for the roots to penetrate.
Plant as follows:
- Insert the spear vertically, and then push it back and forth slightly. Twist it through 180˚ and remove. in heavy clay it may be necessary to make a second cut at 90˚ to the first cut and then twist again.
- Carefully position a plant in the hole, so that the top of the plug is 12mm (half an inch) below the soil surface. There must be good contact between the sides of the plug and the soil, so that the plug does not dry out.
- Insert the spear again about 5cm (2”) from the plant, and pull the handle towards you, so that the spear firms the soil at the base of the plug. Then push the handle away from you to firm the soil at the top of the plug.
- Cover the top of the plug with a handful of soil. Gently firm around the plant, being careful not to damage it with your boot.

Pit planting
Pit planting is considered by some to be the better way of planting, because the soil is removed, broken up, and replaced around the roots. However, with small, vigorous transplants there is little advantage in digging a pit, which is slower and harder work than making a notch. young tree roots are very strong, and have no problem penetrating most soils as long as the tree is not having to compete for water or nutrients. However, notch planting which is poorly done, with roots crammed into too small a space, or with notches not closed properly, will result in losses.
In many situations a ‘hybrid’ method works well. One person cuts through the turf and digs out a sod of earth which is kept on the spade, resting on the ground by the hole.Another person places the tree in position and spreads the roots, while the first person crumbles the soil back into the hole. With experience, one person can do this on their own by tipping the soil gently off the spade whilst holding the tree in the other hand, although it needs strength in the wrist to hold the laden spade! This method is nearly as fast as notch planting.
Pit planting (see below) is recommended in the following situations:
- Where the young tree has roots which are too bushy and spreading to fit in a T notch. Some species produce bushy roots even at the seedling or one year stage. larger and older bare-root plants will tend to have more bushy roots.
- In clay soils (see below)
- In very friable, crumbly soils such as cultivated garden soil, in which a notch tends to collapse so you end up digging a hole anyway.
- For container-grown plants other than cell-grown stock.
Pit planting should not be used as an alternative to whole site ground preparation. For example, on wet clays, if you simply dig a pit without generally improving drainage, the pit will fill with water and the tree roots will ‘drown’.
When pit-planting bare-root stock it is not generally necessary to add any organic matter such as compost or manure. Additional organic matter may be helpful when planting container-grown stock (see below).
Clay soils
Clay soils are a problem. If you cut a notch, the sides of the notch are smeared by the spade producing a surface which is difficult for roots to penetrate. The notch itself may re-open in dry weather when the clay shrinks. If you dig a pit, this can become waterlogged in wet weather, creating anaerobic conditions that kill the roots. Adding compost or other soil improvers can worsen this tendency for the pit to become waterlogged and anaerobic.
In some clay soils, you may be able to break up the subsoil at the bottom of the pit, ensuring that water drains through freely. On other sites, the whole tree planting area will need deep ripping or ploughing in order to break up the clay.
Clay soils are also a problem when it comes to maintaining bare ground around each tree, as the bare ground tends to crack in dry conditions, exposing tree roots to drying. A thick layer of organic mulch, renewed annually, will help prevent this.
Procedure
To pit plant a tree:
- When planting in grass, you will need first to remove some turf. If you are going to use herbicide or mulch for weed control, you need only remove sufficient turves to dig the pit. The turves can be inverted around the pit, or set aside and then inverted in the original position after planting. Alternatively they can be chopped up in the bottom of the pit. If you are going to hand weed, a much bigger area of turf must be removed.
- Dig a pit large enough to take the tree roots or rootball, putting the soil to one side. If the topsoil and subsoil are noticeably different, keep them separate. you can put the soil on a plastic sheet for easy retrieval. Discard any large stones. Dig the hole square, rather than round (see next section).
- In cohesive soils, loosen the soil in the sides and bottom of the pit with a spade or fork. In crumbly soils don’t touch the sides or they will collapse, and you’ll have to start again!

- Working quickly but carefully, place the tree in the pit, spreading the roots, and checking that the soil collar is at the correct height. Adjust as necessary, by adding or taking away more soil. If working as a pair, the other person then backfills carefully around the roots, using the most friable soil first. Shake the tree gently so the soil trickles through the roots and any air spaces are filled. Then use the remaining soil to fill the pit, finishing it level with the surrounding soil. Firm the soil with your hands or feet, but don’t stamp hard around the tree or you are likely to both over-compact the soil and scrape the bark of the stem.
- Water the tree if possible.

Container-grown plants
Evergreen species of tree, including the native holly, yew and box do not transplant successfully bare-root, and have to be grown in pots or other containers. Garden centres and other outlets sell a huge variety of other container-grown trees and shrubs, for all year round sales and planting. For conservation and amenity purposes, container-grown plants should only be used for the native evergreens, for particular garden cultivars that are only available this way, and for the occasional ceremonial planting which can’t be done during the normal planting season!
Most container-grown plants are grown in composts mainly comprising peat, although composted bark, coir and other organic materials may be used. These are light, clean materials which promote rapid root growth, but can make it difficult for the plant roots to adapt to the surrounding soil. The rootball may also have a different type of water- holding ability, so that the surrounding soil can be fairly moist, while the peaty rootball dries out and does not easily re-absorb water. When planting, cover the top of the rootball with a layer of soil to prevent the rootball acting like a wick and evaporating moisture from the compost and soil. If a rootball of peat compost has dried out, it can be rewetted by watering with a solution of about 5 ml of washing-up liquid in 5 litres of water.
For these reasons, it is important to cultivate a larger volume of soil when planting container-grown plants, and to mix soil improvers such as compost or leaf mould into the soil backfill. The main purpose of these is to make an even gradation between the compost in the rootball and the surrounding soil, so that roots can more easily make the transition.
Research has shown that plants do better in square pits, rather than round. This is because when new roots meet the junction of the backfill and the side of the pit, they tend to curve round and follow the side, especially if they have already been growing spirally in a container. This tendency is increased if the backfill is markedly different from the surrounding soil. However, on meeting the corner of a square hole the roots are reluctant to turn a right angle, and instead break out into the surrounding soil.
Plants should always be removed from the container, even if the container is meant to be biodegradable, to ease the passage of roots into the new ground.
Procedure
- Make sure the compost in the container is thoroughly watered. If it has been allowed to become dry, you will need to rewet it as described above, or stand it in water for an hour or so until water has been reabsorbed right through the rootball. If put in the ground dry, the compost of the rootball does not easily re-wet.
- Remove the turf as described above.
- Dig a square hole about twice the volume of the container, and pile the soil neatly to the side, keeping topsoil and subsoil separate.
- Put some compost or other organic matter into the hole and mix it in with some of the saved topsoil, bringing it up to about the level of the base of the pot. you can check this by putting the plant in the hole, still in the container, and then adjusting the amount of soil as necessary.

- Remove the plant from its container. if the roots are at all coiled around in the shape of the pot, you should gently loosen them and prise them out, or they may continue to grow around in that shape. if it’s very firm, loosen the sides of the rootball with your fingers. if the roots are very badly coiled and are impossible to prise out, this shows that the plant has been kept too long in the container, and is potbound. Any plants like this should be rejected and returned to the supplier.

- Place the plant in the hole with the top of the rootball just below the surrounding soil, and backfill with the remaining topsoil and subsoil. Cover the top of the rootball with topsoil. Tread gently to firm the plant into position. Water it thoroughly.


Staking
The aim should be to use small, young trees which do not require staking, and which will establish faster than larger trees. Stakes and ties add to the cost of the scheme, and the maintenance requirement.
However, whips and standard trees may sometimes need to be planted, perhaps where a particular species or cultivar is only available in that size. Avoid planting this size when the only reason is for instant impact. Smaller whips need not always be staked, although this may help protect them from accidental damage on some sites. Standard trees will need to be staked against movement by the wind, but only a short stake should be used, with a fairly loose tie. The reason is that the flexing of the tree in the wind stimulates root growth to naturally brace the tree, and also stimulates growth in stem diameter at the base of the trunk. If the tree is so tightly staked that it cannot sway, this natural bracing does not develop, and it is then very likely to snap or be blown over when the stake and tie are removed.
If you must use a standard tree, stake it as described below. Don’t use a taller stake than is necessary (see point 2 below). Stakes pressure-treated with preservative are not required, as the stake only has to last about two seasons. However, if the stake is also being used to support a tree guard, a hardwood or preserved softwood stake may be advisable. Don’t use stakes of imported hardwood.
- Plant the tree as normal, but don’t completely backfill the pit.
- Knock the stake into the bottom of the pit, on the windward side of the tree, as close as possible to the rootball without damaging it. The stake should finish at a height no more than one third of the height of the tree. Backfill the hole.
- Loosely attach the tree to the stake, using a proprietary tree tie. Many different types of tie are available, so check with the supplier if you are not sure of the correct way of fitting. Ties should form a figure of eight or have a spacer between the tree and the stake, to prevent chafing. Most ties will need nailing to the stake to stop them slipping, unless they can be fitted just above a branch. Buckle ends should be against the stake, not the tree, and should normally be nailed. Check the tree and stake frequently, and remove the tie at the beginning of the second growing season, by which time the tree should be securely anchored by its roots. If it’s not, then the tree is not growing sufficiently well, and other steps (Chapter 7 – Aftercare) will need to be taken to encourage the tree into growth.
Double stakes can also be used, as shown in the diagram. These are more reliable and less likely to cause chafing. They also act as protectors against careless mowing, which is a significant cause of damage to young trees.

For container-grown or rootballed trees, an angled stake can be used to avoid damaging the rootball. Angle the stake at 45˚, positioned away from the prevailing wind so it is not loosened by the action of the wind on the tree.
Planting cuttings and sets
The simplest way to plant a tree is to insert a cutting into the ground. This works well for willow and poplar. This method is widely used in nurseries for propagation of willows and poplars, and can also be used for planting direct into the final planting position.
Cuttings should be 20-25cm (8-10”) long and 1-2cm (1/2”) diameter. Make a hole at the planting position with a bar or similar, of a diameter just greater than that of the cutting. The hole should be about 2-3cm (1”) shorter than the cutting. Don’t use the cutting itself to make the hole. Insert the cutting, so that about 2-3cm (1”) is protruding, from where the first bud will grow. Tread in firmly, to ensure they fit snugly.
Note the following:
- The ground must be suitable for the species. Willow and poplar grow best in wet or moist soils.
- As with planting a young tree, the planting position should be clear of weeds, with at least a metre square kept clear of weeds for at least two growing seasons.
Although the size of cuttings or sets is normally as recommended above, much larger, thicker ‘cuttings’ can regrow. Even fencing stakes of willow, freshly cut and untreated, will regrow if set in the ground the same way up as they were growing!

Using willow cuttings can be a useful way of establishing tree growth in areas prone to vandalism. As desired, other species can then be planted amongst the willows to create a mixed woodland. This should be done within one or two years, as willow grows very fast and it will get increasingly difficult to establish other trees amongst them.