It is possible to build dry stone walls without any tools at all, especially if rebuilding from an existing foundation. In most cases however, a few tools are useful, and may be essential for working with some types of stone.
On group projects enough hammers should be supplied so that one is within easy borrowing distance of every worker. Common sense should suggest the number of other tools needed for each situation. It is worth applying a strip of brightly coloured paint to the handles of hammers and other inconspicuous tools, to make them easier to locate when laid down among stones. Don’t paint the grip part of the handle, as the paint may flake and affect the grip.
For all projects
First aid
First Aid boxes should contain a sufficient quantity of First Aid materials and a guidance card. The number of First Aid boxes should meet the risks identified in the risk assessment. In most cases in the field, one standard kit (for 10-12 people) will be sufficient, but if work is taking place at several locations, each one will need a kit.
Pinched or crushed fingers present the most frequent problem. Stubbed toes and sprained ankles are also possible, as are sore eyes from dust and stone chips.
The recommended contents for a work party are:
A first aid kit suitable for use in a workplace for up to 10 people
| Guidance card | 1 |
| Waterproof plasters | 20 |
| Sterile eye pads, with attachment | 2 |
| Individually wrapped triangular bandages | 4 |
| Safety pins | 6 |
| Medium sterile dressings (12cm x 12cm) | 6 |
| Large sterile dressings (18cm x 18cm) | 2 |
| Alcohol free cleansing wipes | 6 |
| Scissors | 1 |
| Pairs of fine transparent disposable plastic gloves | 2 |
| NOTE: Where mains tap water is not readily available for eye irrigation, sterile water or sterile normal saline (0.9%) in sealed disposable containers should be provided. Each container should hold at least 300ml and should not be reused once the sterile seal is broken. At least 900ml should be provided. Eye baths or other refillable containers should not be used for eye irrigation. | |
| NOTE: The first aid kit must be kept in a suitably marked container which will protect the contents from dust and damp. | |
The following ‘welfare kit’ is also found to be useful:
Welfare kit suitable for use in additional to a first aid kit
| Pair of tweezers |
| Safety pins |
| Needle and thread |
| Pencil |
| Sanitary towels |
| Whistle |
| Toilet roll |
| Cotton wool |
| 30 plasters |
| 3 finger pouches |
| Rubber gloves |
| Insect repellent |
| 2 x 10p pieces |
| Sun cream |
| Barrier cream |
A list of local hospitals with casualty departments should also be to hand.
Some wallers also carry home-made leather tube patches which can be slid over sore, chapped or scratched fingers, and strapped around the wrist with a thong. The leather should be supple enough to bend easily.
An eye sweep is another useful item. This consists of a thin metal stem, about the size of a match stick, with a long soft elongated loop of platinum wire clamped to the end. Use it to sweep stone fragments from the eye without any danger of scratching the eye’s surface. Eye sweeps are available from welding suppliers.
Tools
- One or more walling hammers, the type depending on the stone.
- Sledge hammer, 14lb (6.3kg)
- Lump (mash or club) hammer, 4lb (1.8kg)
- Heavy-duty garden spade, Devon shovel or small round-mouthed shovel, for digging foundations, cleaning around the base of an existing wall or a retaining wall or stone-faced bank. This can also be used for mixing mortar or concrete as required.
- Pick or pick-ended mattock, to supplement the spade or shovel, and for digging up field stones. In the south west, the ‘digger’, which is a mattock with a single broad blade, is sometimes used instead.
A useful variant of the normal pick is the ‘tramp pick’, once common in Aberdeenshire but now available only through sources of second-hand tools. This has an all-steel shaft and single pick blade with a wooden handle and adjustable foot rest.

Unlike the ordinary ‘shoulder pick’, the tramp pick is used in the position shown, to lever and manoeuvre large, heavy stones into place, for example when positioning foundation stones in walls. The foot rest may be left on or removed as convenient. Tramp picks were made in weights of 10lb (4.5kg) to 18lb (8.1kg), depending on the work they were designed to do. - Batter frames or line bars, with lines and pins, for setting out the dimensions of the wall.
- Plumb bob and line, for measuring the vertical.
- Spirit level. Most wallers level up by eye, but a spirit level is useful for beginners, to help keep courses of stonework running correctly, and for work with cut and dressed stone.
- Steel tape measure, for setting lines and checking heights.
- Fencing pliers, for removing or constructing temporary wire fences across gaps.

Shifting and transporting stone
- Two crowbars
- Wooden or metal rollers, from 1″ (25mm) to 4″ (100mm) diameter for moving very large stones.
- Several 2 x 8″ (50 x 200mm) planks, 6-8′ (2m) long, to use with rollers for moving large stones.
- Wooden blocks, 2 x 2″ (50 x 50mm) or more, by about 2′ (600mm) long, to prop up large stones for moving and shaping.
- Buckets, barrow, sledge or trailer, depending on the amount of material to be transported to the work site and the distance involved. Buckets are useful for carrying small quantities of fillings and concrete or mortar short distances. Use heavy-duty rubber, not plastic or metal buckets which wear out quickly.
 Traditionally, various forms of low, small-wheeled carts and simple sledges were used for shifting stones from local quarries down to the wall. A hand barrow, for use by two or four people, is good for moving small loads short distances over rough terrain.
A rubber-tyred wheelbarrow is best for a single worker to move earth and stones over fairly regular ground. - Powered transport. Trailers pulled by tractors or four wheel drive vehicles may be needed to get new stone onto the site.
A power carrier is a useful machine for carrying stone over rough ground which is not accessible to tractors or other vehicles. The power carrier is a tracked barrow, powered by a 4 or 5.5 horsepower engine, which can carry loads of up to half a ton (500kg) on level ground, equivalent to 10 times the capacity of a wheelbarrow. They have low ground pressure tracks which cause little damage to soft ground, and can climb gradients of up to 25˚. They are manufactured by Honda, from whom a list of local suppliers is obtainable. - Hand winch, for moving large stones. TCV can supply the Tirfor 800kg (three-quarters of a ton) capacity winch, together with accessories and spares.

Hammers
Hammers for use in dry stone walling were probably adapted from traditional mason’s tools. Hammers are necessary for splitting, trimming or shaping of most types of stone, and for breaking large blocks down to a manageable size. The discussion which follows emphasises regional variations in the sort of hammers used, but for most purposes any single-handed shaping hammer, plus lump and sledge hammers for general use, should prove adequate.
Craftsmen show regional and individual preferences for various shapes and sizes of hammers. Whilst size and shape are determined largely by the type of stone to be worked, individual preference means that many wallers become attached to particular hammers, with which they can work most stone types sufficiently well for walling purposes.
Throughout most of northern England, especially in the Carboniferous limestone areas, hammers are carried but used sparingly, if at all. Many craftsmen of the region consider it something of a defeat to have to break their stone. Elsewhere, where well-bedded stone is abundant, wallers routinely trim it to convenient shapes and break it into smaller bits for fillings. Cotswold stone can be shaped so readily that craftsmen there use the hammer almost continuously to achieve a regular, finished appearance.
Whatever the type of hammer, it must be tempered to suit the materials. Hammers for hard stone such as granite, and general purpose lump and sledge hammers for use on metal as well as on stone, must be steel headed. Most walling hammers should not be used on metal. Cast iron hammers or mells should never be used for walling, since they may shatter or shed metal splinters when used on anything harder than wood.
Walling hammers may weigh from 1lb (0.45kg) to 25lb (11.3kg), with the heavier hammers used on harder, more massive stone. Most craftsmen carry at least two; a light hammer for splitting or trimming smaller stones, and a heavier sledge-type hammer for breaking boulders into useable pieces.
Throughout the Pennines, the usual walling or ‘scabbling’ hammer has one square and one pointed or blade end, with its axis either parallel or perpendicular to the handle. This type is commonly referred to as the Yorkshire or Pennine walling hammer.

The square end is for knocking pieces off stones, and the pointed end is for splitting stone along its bedding planes. The head weighs 2-3lb (0.9-1.3kg).
Many Welsh wallers also use what they describe as ‘scabblers’. These can be found in a wide variety of weights and patterns covering most of the types described in this section. They have the common feature of at least one square head with a concave face, in effect giving it two cutting edges.

These are difficult to come by, and as with tramp picks they can only be obtained from farm sales and auctions. Modern equivalents can sometimes be found where the faces are additions to poorer quality metal heads. Whilst better steel is used for the face than the rest of the head, they are generally eschewed as not being up to the quality of older hammers. They are primarily designed for dressing harder stone such as granite, and the edges become dulled with use and need frequent maintenance. As with the maintenance of square heads, it may be difficult to find a smith able to temper them correctly.
 In areas of Scotland where the stone is well bedded, two types of hammer are distinguished. The usual type has both ends tapered with a square pein.
The ‘cachie’ or small mason’s hammer is similar to a Pennine hammer, and is sold by the Dry Stone Walling Association as the ‘catchee’ hammer. A blocking hammer has a symmetrical rectangular head with squared ends.

In the Cotswolds the typical walling hammer has a symmetrical tapered head with two ‘polling edges’ about a quarter inch (6mm) thick for rough shaping of the stone, or one polling edge and one thinner ‘dressing edge’, used for fine cutting. These hammers are available in several weights, with 3.5-4lb (1.6-1.8kg) being usual.
 Some wallers use a 4-5lb (1.8-2.2kg) square-faced ‘stone maul’ for breaking large stones, and a bricklayer’s hammer for splitting and shaping stone. The pick end is also useful for ‘sculpting’ the foundation trench to take awkward stones, and similarly with stone hedges, for shaping the earth bank to fit the face stones, and to backfill behind them.
 Other wallers favour a type similar to a geologist’s hammer, with a spiked pick end which is particularly useful for removing awkward lumps from the bases or tops of stones.
In practice, most wallers today use those hammers which are most readily available commercially, which means lump hammers, bricklayer’s hammers and walling hammers.
Maintenance of hammers
Hammer heads tend to wear more at the front that at the rear corners, because even when trying to hit a stone squarely, one tends to swing a bit too far.

After the front corners have worn about quarter of an inch (6mm) they become too rounded for accurate splitting, and the head should be reversed to bring the other corners into play and promote more even wear. A badly worn hammer head can be squared by a blacksmith, but care is needed to re-temper it properly. A hammer haft should last for about 6 months of frequent use, provided you don’t drop a stone on it. Once a handle becomes badly frayed or splintered it should be replaced.
The procedure for rehafting hammers is described in Toolcare – Replacing hafts and handles.
Batter frames
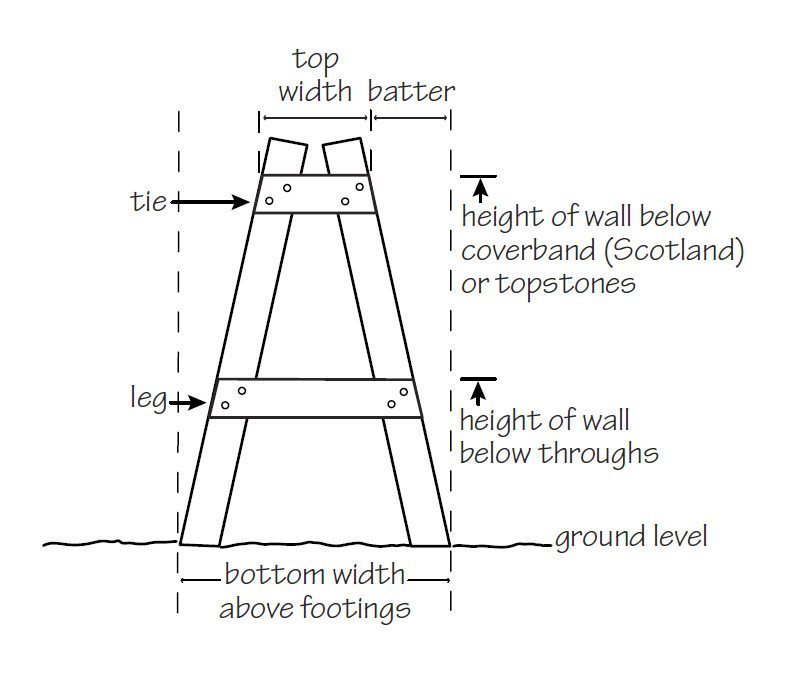
Batter frames are also known as walling or dyke frames, patterns, wall gauges and templates. Walls of different specifications require different frames, although within any district there are usually only one or two standard specifications. Frames are unnecessary for minor gapping work, and in the north of England they tend not to be used except on local authority and other exacting jobs. However they are very useful for beginners to ensure that the wall is built to the correct profile and that the layers are kept level. They should be constructed beforehand according to the specifications of the wall to be built, and carried to the work site.
Depending on personal preference, the frame can be made with either inside or outside measurements to give the dimensions of the wall. The frame should be made carefully, to ensure the batter is exactly the same on both sides, and that the ties are horizontal.
Outside measurements
In the example below, the outside measurements give the dimensions of the wall, and hence the lines are attached to run from the outside of the frame. The ties give the heights of throughs and top of wall without coverstones.
An alternative pattern uses a diagonal brace, with the heights of throughs marked by a line attached at the required height.

Where the frame sits on the foundation stones (footings), set it up on a pair of stones which are level and finish at ground level. If this is not possible, allowance will have to be made where, for example, the foundation stones are above ground level. An alternative arrangement is to make the frame so that it has extended legs, and sits on the base of the foundation trench, at a measured depth, as shown above.
The frame should be set carefully to the vertical, using a plumb bob as shown. Alternatively a spirit level can be used across one of the ties. If the frame is not level due to uneven foundations, level up the legs as necessary with thin stones. A wooden prop with a large nail can be used to secure the frame in the required position.


Inside measurements
The inside measurements of this type of frame give the dimensions of the wall, with the lines attached to run from the inside of the legs. This type of frame can be set out before the foundation trench is excavated, and used for getting the line for ‘nicking out’ the edge of the foundation trench.

Stone hedges
South Western stone hedges and stone/turf hedges usually have a concave batter, which requires a more complex pattern. Two types are shown below. The one shown left is made of wood, and is held up against the side of the hedge from time to time as work progresses. The right hand pattern is made of metal tubing bent to the required shape, and secured by flat bolted metal bars and a curved tubular top section. It can be set up like a normal batter frame, propped with a pole lashed to the top cross bar.

Another method is to cut a frame out of plywood to the required shape, using a jigsaw.
Lines
Guidelines should be nylon rather than hemp, which stretches and soon rots when wet. Bricklayers’ pins are useful for securing lines to an existing wall, or for tightening them where they are fixed to a frame, or extended to the ground. Thin wooden wedges or even bricklayers’ trowels can be substituted for these pins where they are fixed to the frame, or longer metal pins or wooden stakes can be used where they are extended to the ground.
Line bars
Line bars are an alternative to frames. They are adjustable, and can be set to any dimension as required, and so are useful when rebuilding a wall or gapping. They are also more portable than frames, which is useful where the site is not accessible by vehicle.
Line bars are also useful when working with groups, as a number of sets can be used to divide up the wall so that pairs or small groups have distinct sections to work on. Having several sets also lessens the chance of error caused by someone further along the wall fouling the line.
The most readily available bars are hooked fencing pins, as used to secure safety netting alongside roadworks and other worksites. Generally these are about 4′ (1.3m) long with a diameter of about half an inch (10mm). They have to be driven in about a foot (300mm) to secure them in the ground, so they are not suitable for high walls. Care needs to be taken when knocking them in, and particularly when removing them, as they are fairly easy to bend. Remove by twisting and pulling, rather than by pulling back and forth to loosen.
A better choice are steel rods purchased to order from a local blacksmith or steel merchant. These should be 5/8″ (16mm) diameter steel, to the length required for the height of wall, allowing for a maximum of 18″ (450mm) to be driven into the ground. Lengths of 6-7′ (1.8-2.1m) should cover most eventualities. Rods of 3/4″ (20mm) diameter are less prone to bending, but are considerably heavier to carry. Ribbed steel reinforcing bars are a good alternative as they rarely bend, although some wallers don’t like them because the ribs make it a little more awkward to adjust the lines. Some wallers have one end of the rods pointed to aid driving them into the ground, though in practice the rods are thin enough to penetrate most types of ground without being pointed.
Adding to stability
To aid stability and to stop the bars splaying apart during the building process they should be clamped together. A simple clamp can be made out of two lengths of 2 x 1″ (50 x 25mm) batten, and either one or two pairs of bolts, wing nuts and washers.

The length of the batten and position of the bolts will need to fit the local style of wall, but the dimensions shown should cope with most wider-topped walls.
The clamp is positioned so that its base corresponds with the height of the wall excluding the topstones. Ensure that it is level. If the bars are still not solid, they can be temporarily secured with large stones, as shown.

It’s important to remember that it is the inside of the bars which marks the position of the face of the wall. Fasten the lines so they run from the inside of the bars. Lines are usually fastened by extending them beyond the bars and pinning them in the ground.