In choosing the design of post and rail fencing, consider the following alternatives:
Attachment of rails to post
The rails can either be set into mortises cut into the post, or nailed onto the post. Mortised rails are much stronger, because they do not rely on nails, which can become loose, causing the rail to become dislodged. Nailed rails also suffer from casual vandalism. Under normal use, riven, mortised rails are extremely durable, but if they are damaged, repair is awkward. Because of the cost of cutting mortises and the slower erection time, mortised fencing is normally more expensive than nailed fencing, and is less commonly used.
Cleft rails are set into single or double mortises, cut into cleft or sawn posts.

Scarfed softwood rails are set into a single through mortise and nailed as shown. The length of the taper allows the nails to be knocked in at a good distance from the rail end, thus lessening the chance of splitting the wood. Scarfed softwood rails for mortised fencing should be bought prepared, so that they are treated with preservative after cutting. If you cut them yourself from ordinary rails, untreated wood will be exposed.

Scarfed, riven hardwood rails can be wedged rather than nailed.
Driven or dug posts?
As explained here, pointed stakes that are driven into the ground are firmer and quicker to erect than posts set into dug holes and then firmed with backfill. However, most post and rail fencing uses posts which are set into dug holes and backfilled. This is because it is necessary to line up the faces of the posts for nailing or mortising, and it is difficult to drive half round or square posts accurately, without them twisting. Round stakes do not give sufficient surface for nailing, although they can be used for mortised posts. Driving the posts can also cause damage to the tops, which is not usually acceptable for high quality post and rail fencing. Mortised posts must be set in dug holes, because of the technique required to fit the rails (see below).

In deep loamy soils it should be possible to drive in half-round stakes accurately. A post holder makes it easier to hold the post safely and securely while it is being driven. Making a deep pilot hole with a crowbar will help in stony soils, by forcing any stones out of the way.
A traditional post and rail design has the main posts set in dug holes, with smaller alternate posts, called ‘studs’ or ‘prick posts’ driven into the ground. These strengthen and stiffen the rails.

Designs
Various designs of post and rail fencing are given in chapter 1. Most designs are based on the traditional 6ft (1.8m) spacing between posts, with 12ft (3.6m) rails. The rails are either overlapped between equal-sized posts, or mortised with alternate posts and studs.

The British Standard size for rails in nailed post and rail fencing (BS 1722-7:1999) is 38 x 87mm (11/2 x 31/2“). This, or a near equivalent, is suitable for most uses. Lighter rails, of 30 x 75mm (11/4 x 3″), may be adequate for light stock control, to support rabbit netting, and pedestrian control where the fence is unlikely to be climbed. Heavier rails, of 50 x 100mm (2 x 4″), may be worth fitting on fences which are likely to be frequently climbed, whether this is an intended use or not.
Posts range from 100mm (4″) diameter half round for light nailed fences, to 75 x 125mm (3 x 5″) for heavy nailed and mortised fencing.
As well as the standard patterns available from suppliers, you can make up your own designs to suit particular situations. It’s cheaper if you use standard lengths of posts and rails, but most firms will supply posts and rails to your requirements.
Cleft or riven fencing
With the need to revive old uses for coppiced woodland, and to find new ones, there is a revival of interest in cleft or riven hardwood fencing. With concerns about sustain-ability, there is also great attraction in using a material which requires no preservative treatment, and which may be obtainable from local woodlands.
Purchased riven fencing is usually of dried and preserved softwood posts, supplied with ready cut mortises, and seasoned riven hardwood rails, shaped to fit the mortises. This ensures an accurate fit of the tenons into the mortises. The problem with using newly cut or ‘green’ wood is that as the wood dries it shrinks, so tenons may become loose in the mortises. The general rule is to try and construct the fence using dry tenons, which will not shrink further, set into mortises cut in green posts. As the posts dry the mortises will shrink, so gripping the tenons tightly.
The dimensions and tolerances of various designs of cleft post and rail fencing are given in British Standard 1722-7:1999.
For detailed information on the tools and techniques for green woodworking, consult Tabor (2000) or Abbott (1989).
Cleaving
To make cleft or riven posts and rails, you will need fairly straight coppice oak or chestnut stems, about 200-250mm (8-10″) diameter. Posts are normally 1.8m (6′) high, and rails 2.8m (9’3″) long, although other dimensions can be used as desired. Lengths must be accurate for the design chosen, or construction will be impossible, but there will be some variation in the other dimensions, which gives character to the finished product.
The wood should be worked green, when it is easier to split and work. After felling, cut to the required length. Lay the pole on two other poles as shown, to keep it steady. Using a lump hammer or sledgehammer, tap in a metal wedge lightly, so that it stays in position, about a foot in from the end of the pole. Then knock in further with the sledge, to open up a split.

As the split opens up, place and then knock in another wedge along the split, to extend it. Continue to add wedges until the split extends to the far end of the pole. Then hammer in the wedges in sequence to cleave the pole. The resulting half-round poles can be used for stakes in nailed post and rail fencing, or can be mortised for mortised fencing. For rails, the same technique is used to split longer poles into four. A 200-260mm (8-10″) diameter pole should produce two large half round posts for mortising or four smaller stakes or four rails.
Shaping
Poles or large half-rounds can be used as they are, or can be shaped or ‘sided up’ to make roughly square posts. Large poles can be raised just off the ground as shown, and then shaped with a side-axe. The side-axe has a flat face and a bevelled face, and is used with the flat face towards the pole, so that the wood is removed in long, straight shavings to give a fairly smooth finish. Short vertical cuts make it easier to cut the waste away. Stand on the far side from the tool, so that the pole protects your legs.

Alternatively, a tool called an adze can be used, in which case the worker stands astride the pole. Either secure the pole against a stump or similar, or preferably make up a jig as shown, which holds the pole below the level of the feet, to avoid injury.


Larger half-round posts can be treated similarly. Alternatively, if using a side axe it may be easier to lean the half-round up against a stack of logs or similar, making sure it can’t slip.
Posts to be used round only need the bark removing. Heavy poles can be laid on the ground, and the bark removed with a bark peeling spade. Alternatively, hold the pole steady and at a comfortable height on two stout wooden crotches, and remove the bark with a draw-knife.
Mortising
Mortises are most easily made using a mains-powered router in a workshop. A jig can be made up for easy and accurate measurement of the mortises. Where posts are rectangular in section, the mortise is made into the longer face.
To cut the mortises by hand, use a mortising or firmer chisel and wooden mallet as shown. Alternatively, drill out and then remove the waste with a chisel. Use a manual or battery-operated drill if working outside.

The size of the mortise will depend on the style of the fencing and the dimensions of the rails. With a single through mortise, the rails can be overlapped as shown, and wedged tightly with a small wedge of wood.

Alternatively, single ‘blind’ mortises can be cut, about 40mm (11/2″) deep. The posts used here are about 200mm (8″) diameter, sided-up to produce roughly square posts. This massive type of fence will last for generations.

Machine-cut double mortises are used in treated softwood posts, with typical dimensions of 25 x 89mm (1 x 31/2“), arranged as shown (Jacksons Fencing).
Rails
Using the techniques shown above, split a round pole of at least 150mm (6″) diameter and normally about 2.8m (9’3″) long into four or eight, depending on the style of fencing. Debarking is not necessary. The ends are shaped to fit the mortises using a billhook or sideaxe. Shape the tenons so that the heartwood is uppermost, as this is the most durable part of the timber and will resist weathering.
Erecting the fence
There are two basic methods of erecting a post and rail fence:
- Erect the posts all along a section of fence, and then attach the rails. The spacing of posts must be extremely accurate.
- Erect the posts and attach the rails in one operation, which avoids potential problems with post spacing. This method has to be used for mortised fencing.
With nailed fencing the choice will depend on:
- The type of ground: On level ground with easy soil conditions it should be safe to proceed with putting in posts some distance ahead of the rails. The method described below of laying out the rails on the ground is the usual method of measuring the post spacing. On undulating ground where measurement is more difficult, and rails may need to be adjusted to fit, it will be easier to attach the rails as you proceed.
- Available labour: In order to effectively employ a group of volunteers on a single run of fencing, it may be necessary to erect the posts ahead of the railing to keep all hands busy. In stony ground, where hole digging is slow, post erection takes much longer that nailing the rails. Where a group can be split into twos and threes working on separate sections of fence, each can erect and nail as they go.
The following procedure is for building a nailed fence with overlapped rails.
Marking out the line
Mark the line of the fence in one of the following ways.
- Use a bricklayer’s line, or a line of strong twine, securely attached with pegs or temporary stakes at the ends and changes of direction.
- On fences which are going to have one or more wires in addition to the rails, a wire can be attached and partly strained to give a good, true line. Bottom wires may be useful to make the fence lamb-proof (fence no. 13), and wires are also useful as anti-vandal devices. Erect the first post permanently, to give a reasonable anchorage for the wire, and then mark any changes of direction with temporary stakes. Tie the wire off at the first post, and run it out to the end of the fence line and fasten with wire strainers, loosely strained. Prop the end post with a temporary strut as necessary, to provide sufficient anchorage for the wire. A wire is best used for fences where posts are to be driven, rather than dug, as the wire can get in the way of hole digging. There is also the potential hazard of people tripping, or of the wire being broken and springing back. The wire can be detached from the strainers and laid to one side after the post positions have been marked, making sure it is secure.
- A surveyor’s tape can be used as a line over short distances, but is not generally recommended as it is difficult to keep it sufficiently taut.
Marking the post positions
To mark the positions of the posts, lay out a double row of rails on the stock side of the line. Start one of the rows with a half length rail, and butt all the ends up tightly, to give a double overlapping row as shown. At each join, mark the position carefully with a crowbar, held up against the line.

When all are marked, remove the line.
This is easy to do over level ground and short-cropped grass, but is more difficult on uneven ground where the rails tend to slip out of position. The sequence is also displaced if rails are of varying lengths. Check before you begin and discard any that are either too long or too short.
Erecting the posts
See here for information on post hole digging. Put all the spoil to one side of the fence line, or else it gets in the way. Ensure that the correct face of the post is towards the line of the fence, with the rails on the stock side. Rectangular section posts on nailed fences should have their long face to the rails, to give the maximum area for nailing. Mortised posts are prepared the other way, with the long face across the line of the fence.

Check the following for each post:
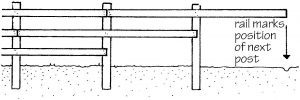
- Post spacing. Use a tape measure, measuring stick, or the rail you are going to use. The rail can be attached ahead of the post, as shown below. This avoids any error, and reduces the chance of wastage from having to cut rails to fit. This method also helps to give the correct height for each post.
- Line. Check that the post is up against the line or wire, and that the line isn’t caught up anywhere.
- Trueness. The post face must be correct for nailing. Check this using the line.
- Verticality. Check this with a spirit level, on two adjacent faces.
- Depth/height. This can be done with a tape measure or measuring stick. Take care that the base of the measurement is taken at the average ground level. If necessary, lay a small piece of wood across the hole and measure from there. On undulating ground, a general line has to be taken, so actual post height may vary (see below). Where the rail is already in position, as shown above, the post height can be measured from the top of the rail.


If you hit bedrock or a large stone near the base of the hole, it may prove impossible to set the post down the required depth. If it is only a few inches short, this should still be deep enough to get the post firm, as long as this is not taken as the general rule for all posts. If the hole is more than about a quarter short of its required depth, the post may need to be concreted in.
Lining up the rails
For good appearance, the rails should always make a smooth line, and should be at a consistent distance from the tops of the posts. For this reason, it’s best to start with the top rail, which is the most conspicuous. If this is correct, the line of the lower rails will follow smoothly. The gap between the bottom rail and the ground will vary over undulating ground (see below).
- One method of lining up the rails is to use a length of twine, stretched between several posts, and held or tied at the measured height, starting with the top rail. The measurement should be of the top of each rail. Then place the rail up to the line, and nail in place. Re-position the line for the second rail and repeat.
- Another method is to use a measuring stick, cut to the height of the post, and marked with the heights of the rail tops. Several of these are useful if a large group is working on the fence. The stick can be used at each post, or in conjunction with a line. Always mark the positions of the tops of the rails. It’s then easy to see that the rail is being held to the mark, and if the rails are slightly uneven in size, at least the tops will be level. Start with the top rail, followed by the middle and lastly the bottom rail.

- A third method is to use measured blocks, made from an old rail or similar, cut to lengths equivalent to the gaps between the rails. Mark each block clearly with either its size, or its position in the sequence. For a large group, have several sets of blocks. They are not suitable for use on uneven ground, where they will result in uneven railing, or on slopes. As shown, blocks will also give an inaccurate measurement if the rails are of uneven sizes.


Undulating ground
Nearly all ground undulates to a greater or lesser degree, and the height of the posts needs to be adjusted to take account of this, so that overall a smooth line results. If you try and erect each post to an exact identical height on uneven ground, uneven railing will result. This is shown, exaggerated, below.

This means that although each post should be as near as possible to the specified height, a variation of up to about 25mm (1″) above or below the specified height will be necessary. If you use the method shown above, the top rail will give the spacing and height of the next post. Keep checking that the height is not going outside the tolerances suggested above.
Alternatively, some people prefer to erect the posts at each end of a rail first, and then use the rail to give the height of the middle post.

Any inconsistency between the bottom rail and the ground is less noticeable than between other rails, and will often become hidden by grass growth.
Nailing the rails
Nail the rails with the appropriate sized galvanised nails. Using a piece of waste timber as an anvil, blunt the ends of all the nails required, to lessen the chance of them splitting the rails. If this is done as you go along the fence, inevitably the post tops get used as convenient anvils, leaving indentations on the surface.
Attaching the rails is easier with one person hammering, and another holding the rail in position and leaning against the post to prevent it loosening during hammering. Hold the rail to the mark on the post, and nail first one end and then the other, using two nails driven in skewed at each end. The skewed nails make it more difficult to pull the rails off. Finally nail the centre of the rail, also using two nails. If you have to work on your own, use a small block temporarily nailed to support the rail end.

Avoid using rails with knots or other faults on curves in the fence line, as they may break when forced into position. If possible, reject and return such rails, or use them for half pieces at either end.
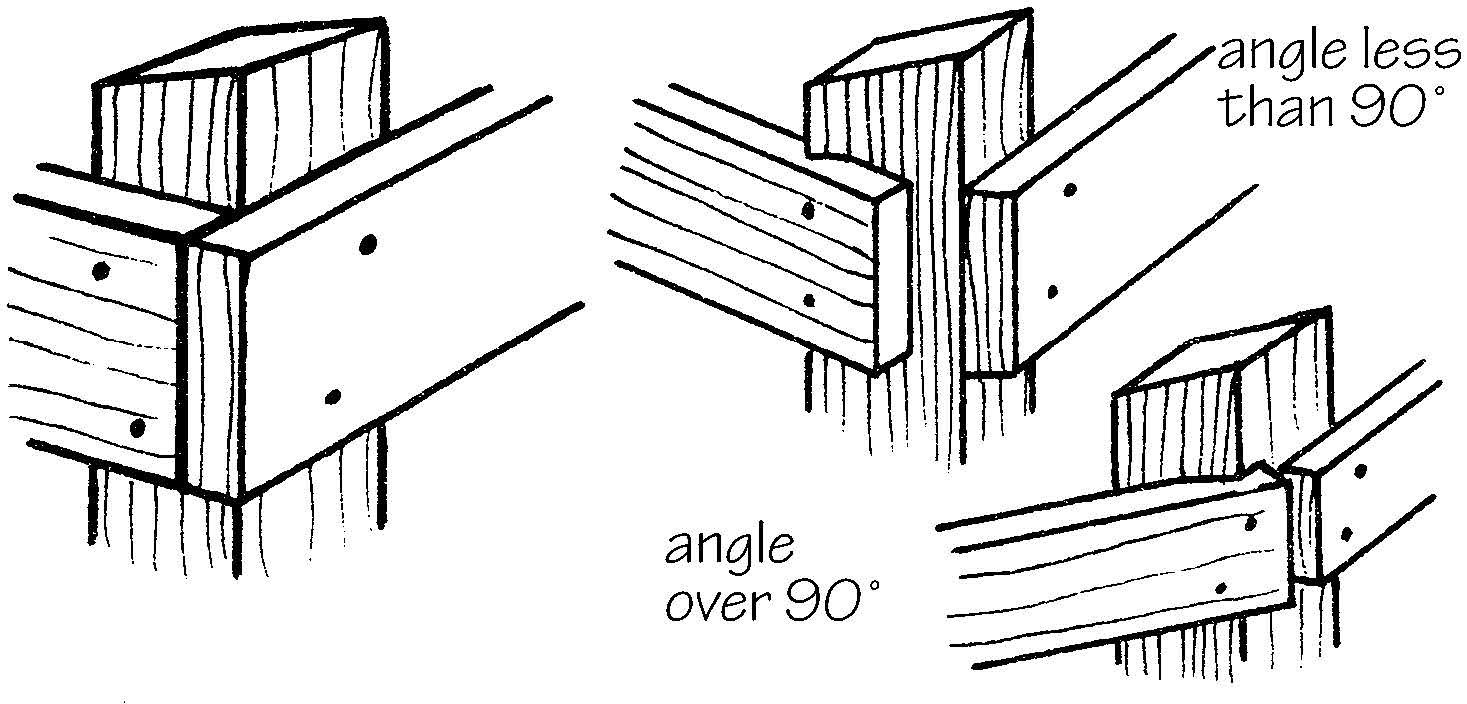
Corners and changes of direction can be made as shown below. It is best to keep any cutting of rebates to a minimum, because they weaken the post, and are time consuming to make. Where necessary, cut rebates with a tenon saw or small bowsaw, and clean out with a chisel and mallet. A surform is useful for finishing off. Paint all cut surfaces with preservative.
Alternatively make changes of direction by using two posts. Although more expensive in materials, this avoids having to cut the timber.

Slopes and Curves
Slopes
Follow the general procedure given above, laying out the line along the route of the fence, placing temporary stakes at corners, angles and breaks of slope. The aim should be to try and get each section between these stakes with as smooth a profile as possible, as otherwise you will have problems fitting the overlapping rails. There is a certain amount of ‘give’ in a 12ft rail, allowing it to be curved either ‘round’ or ‘up and down’, but obviously this must not be overdone as either the nails will give or the rails will break at a knot or any other weak point.

Note the following:
- Longer posts may be needed to compensate for less stable ground conditions.
- Longer posts, and extra rails or a strained bottom wire may be necessary to keep the fence stock proof across concave sections of slope.
- It’s not possible to keep the same overall height and rail spacing as on level ground. In the diagram, gap ‘a’ is smaller than gap ‘b’.

- On very uneven sections of slope it may not be possible to overlap the rails, which will need cutting at each post. Rail ends will also need cutting to fit at breaks of slope. Treat all cut ends with preservative.
- At awkward changes of direction, especially where combined with changes in gradient, two posts can be used as shown above.

Curves
A loosely strained wire is useful for laying out nailed fences along curves. Use the following procedure:
- Erect the two end posts firmly, and then knock temporary posts in at intervals along the proposed curve, spacing them at approximately 3-4 times the final spacing of the fence posts.
- Run a wire out round the temporary posts and strain loosely, leaving the Monkey strainers in position.
- Using the procedures described above, erect the fence along the line of the wire, removing the temporary posts as you proceed.
Mortised fencing
This gives the general procedure for erecting mortised fencing. This includes cleft or riven fencing, and mortised fencing using sawn rails.
The rails of mortised fencing must be fitted at the same time as posts are erected. The general procedure is as follows:
- Run a line out along the route of the fence, using temporary stakes as necessary at changes of direction.
- Dig the first post hole to the measure depth and erect the post, checking that it is vertical, and tamping the backfill thoroughly.
- Saw off the tapered end on the first set of rails, so they fit neatly into the mortises. Treat the cut ends.

- Using one of these rails as a measure, position the next post hole.

- Dig the second hole. Make sure that the hole is at least 75mm (3″) wider than the post, to give sufficient room to fit the rails. Dig the hole as shown, with the undisturbed face towards the start of the fence.

- Put the post in the hole, leaning it away from the start of the fence. Push the rails through the mortises in the first post. Then with one or two people to help, hold the rails in the horizontal position, while the second post is straightened into place with the rails pushed into the mortises. Check that the post is vertical, and all rails securely in position, and then firm the post. Repeat all along the fence line.
- On slopes, the mortises may need enlarging in order to fit the rails.


Repair of post and rail fences
Nailed fences
- Re-attach or replace nailed rails as necessary.
- Posts which have rotted or broken must be replaced or repaired. To replace the post requires digging out the stump of the old one. It may be possible to lever out the old post. Disturb the ground as little as possible, or it will be more difficult to get the new post firm.
- To repair a post which is sound above ground, but rotten or broken at ground level, set a short post immediately next to the broken one, either by digging a hole or knocking the post in. Then nail or bolt the posts together as shown.

Repair of mortised fences
- Depending on the amount of ‘give’ in the post, it may be possible to force the two posts apart just sufficiently to fit a replacement top rail. Do this by putting one end of the rail in position, pushing it as far as it will go into the mortise, and then forcing the other post away, until the rail end can be slipped into place.
- If the above is not possible, or lower rails need to be mended, use the following method. Force the rail as far as it will go into the mortise. Then holding it against the other post, cut off the tip flush with the post.

- Then pull the rail back slightly, so that it slides into the second mortise, with just enough to hold it at either end. If loose, wedge with small wooden wedges knocked into the mortise.
- Mortised riven or arris rails can be repaired with special brackets. These are available from Jacksons Fencing.

