
Fixing the foot
The foot or cross-member is very important in resisting the twisting and upward-pulling forces on the straining post. It should be made of a piece of timber about 300mm x 75mm x 50mm (12″ x 3″ x 2″), or an equivalent piece of round timber. Although rot should not normally be a problem deep in the soil, it is advisable to use preserved softwood or durable hardwood, as with other fencing timbers.
A longer foot should be fitted where extra strength is required. This may include strainer posts for high tensile fencing or deer fencing, or strainer posts in weak soils such as peat. For high tensile fencing the foot should be 500mm (1’6″) long, and at least 1m (3′) long in peat.
When fitting a longer foot, a larger hole will be needed, and extra care is required to make sure the backfill is really secure.
- Hold the foot across the butt end of the straining post, about 50mm (2″) from the bottom, and mark off lines for cutting.
- Cut down with a bowsaw about 15mm at the mid-point of the lines, and then chisel the wood away. Score the wood, and then chisel out the wood in deep strips. Check the foot for a reasonably tight fit in the recess.

- Except in heavy impermeable soils, liberally apply wood preservative to the cut areas as a precaution against fungal attack.

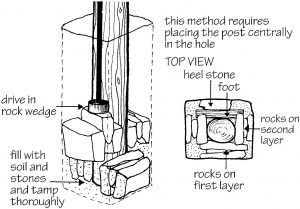
Firming the post
While one person is fixing the foot, the other can be digging out a slot at the bottom of the hole. This must be at right angles to the line of strain, and on the side away from the strain.

- If soil conditions allow, try and excavate a recess at the bottom of the hole to receive the strainer, as shown. Otherwise, if the bottom of the hole is level, there will be a gap under the foot which will not be filled and tamped.
- Estimate the length of the slot using a spade as a measure. It is very awkward to lift a heavy strainer vertically into the hole, and then to have to lift it out again when it doesn’t fit. You will also tend to dislodge material from the side of the hole as you lift the post in and out.
- Having got the post in the hole, find a stone of suitable size to use as a heel-stone, for wedging behind the foot. Again, try and measure roughly whether there is enough room, as the stone is likely to be impossible to remove if it wedges in the wrong place. Tamp the heel-stone down as necessary with a mushroom-headed crowbar, and drop more stones in to wedge as required.
- There are many different protagonists of various best ways to backfill a hole! Some people prefer not to use any rocks, but to rely on the soil, as long as it is of the type which can be tamped. This includes loams and clays, provided the clay is not too wet, but excludes very peaty soils or those containing a lot of organic matter, which will rot away. For this reason, turf or vegetation should not be used for backfill.
The backfill in the lowest part of the hole is the most important, so take great care to tamp it thoroughly. The post should stand firm and solid after the first 300mm or so are tamped. Backfill in layers, tamping thoroughly after every three to four spadefuls.
Other people prefer to backfill with rocks where possible. One method is to drop two largish rocks down on both sides of the post, and then ram a wedge-shaped stone between each pair of rocks, so jamming the post in place. This layer is then backfilled with soil or stones, and then the procedure is repeated on the next layer, using the other two sides of the post. If enough rocks are available, this can be done all the way up the hole.
Other people prefer to use smaller rocks with soil, dropped randomly down the hole and thoroughly tamped in layers. In summary, the method chosen depends on soil conditions and availability of stone. Wet clay is impossible to tamp successfully. Use of rock wedges requires having a mushroom-headed crowbar or other suitable implement for driving in the wedges. - As you near the top, find another suitable rock to use as a breastplate. Alternatively, use a piece of wood, such as a third or half length of fencing stake. This should be placed on the opposite side to the foot, with the top just below ground level. Remove only as much earth as you need to fit the breastplate.
- Finish with the soil raised above the surrounding ground level, so that water does not collect around the base of the straining post.

Fixing the line wire
Once at least two straining posts are in position, a line wire can be attached and strained to give the line of the struts, and of the intermediate stakes. As explained below, it is most important to get the strut exactly on line, and it is not sufficient to position it by eye.
- Attach the wire to one of the straining posts using fence connectors or by stapling.
- Unroll the wire.
- Strain the wire at the second straining post. If you have enough sets of wire strainers, it’s best to leave this set in position, so alterations to the tension can be made as necessary when the intermediates are in place.
Attaching the struts
The attachment of the strut to the straining post is a very important part of the strainer assembly, and needs to be done with care. Often it is done by cutting a wedge, sometimes called a ‘bird’s mouth’, out of the side of the strainer, wedging the strut in place and attaching it with a nail.

This method is not advised for the following reasons:
- The cut effectively wastes part of the straining post and weakens the timber, and increases the likelihood of rot starting.
- Nailing will split and weaken the wood, although this effect can be lessened by drilling a pilot hole.
- There is not enough resistance to sideways movement. An animal or person can dislodge the strut by leaning or kicking against it.
- Although it looks simple, it is difficult to make the cut accurately. A small error in the angle of the cut can result in too large or the wrong shaped wedge being removed.
The method recommended below has the following advantages:
- Only a small amount of the post is removed, and if cut accurately to give a tight fit, the chance of rot starting is slight.
- As the fence is strained the joint tightens up, and there is no possibility of the strut being removed from the side.
- No nail is required.
- Because the joint is made using a chisel, rather than by two drastic cuts with a bowsaw, the novice fencer is less likely to make a mistake. It may take quite a time to get it right, but it is time well spent. Most volunteers also find it a welcome break to spend a while chipping away with mallet and chisel, after the hard slog of hole digging!
Fitting a strut is easier with a round straining post and a strut already chamfered to a point. Fitting a strut to a corner of a square straining post can be rather awkward.
If the struts are supplied on site un-pointed, chamfer them with a bowsaw or billhook. It’s more efficient if one competent carpenter does the whole lot at the start of the task. Give the cut areas at least two coats of preservative and allow to dry before the struts are used.

It is important that a bottom wire is tensioned to give the exact line of the strut. Part of the strength of the fence relies on the struts being as near as possible in line with the tension of the line wires. If the strut is out of line, the straining post is likely to twist and pull out when the tension is put on the wires. If the ground is undulating, check that the bottom wire is not caught up anywhere.
The exact position of the joint between strut and straining post will vary according to the type of fence wires and the method of attaching the wires to the post. If the wire is stapled to the post, it will run out from the side of the post, and the strut can be put exactly on the centre line. If the wires are attached by fence connectors or knots, the wires will run out from the centre of the post, and a strut placed on the centre line would interfere with the wires.

Note that one method of avoiding this problem, as used by Bryce Electric Fencing, is not to use a strut at all, but to rely on an extra heavyweight straining post, raked slightly backwards. The wires are attached through the post, thus giving a perfect line of strain. It is of course more important with electric fencing that the strut does not interfere with the uninsulated wires. Note that the tension on electric wires is lower than that on non-electric strained fencing, so this method of fitting a strainer is not generally recommended for all fencing.

The strut should join the post at a point about two-thirds of the height of the top wire. Note that this not the same as two-thirds of the height of the top of the post. If stapling netting to the post, position the strut so the join will not coincide with any of the wires, if possible. If using a retaining wire, the strut should be fitted at a point three-quarters of the height of the top wire.

If using fence connectors or Gripples/Rapidos on line wires, put the strut at the halfway height. This allows the upper wires to be clear of the strut. The lower wires are joined beyond the strut.

Procedure
- Holding the strut at the correct height on the straining post, mark with a spade where the base of the strut touches the ground. To allow for the fact that the strut will be rebated by about 25mm (1″), and that the angle will be slightly steeper (see diagram), start digging the slot at least 50mm (2″) to the straining post side of the mark. If you start digging the slot too far away from the strainer, more stones or other packing will be needed to get the strut solid. Dig the slot about 300mm (12″) deep at its deepest point, sloping up towards the straining post. Cut it just wide enough to take the strut.

- Hold the strut in position against the strainer. Then using a suitable straight edge, mark a line vertically down through the point of the strut, parallel to the straining post. Remove the strut and cut along the line, and chisel off the extreme tip, as shown. The length of the cut should be about two-thirds the width of the strut, to give sufficient surface area at the joint.

- Put the strut back in position against the straining post. While one person holds the strut, another marks accurately around the cut end to give the area of the mortise in the straining post.

Cut the mortise in the straining post. With sharp taps of the mallet on the chisel, mark off the area in squares, the width of the chisel head. Then working from top to bottom, chisel away the slices of wood. Continue until mortise is about 25mm (1″) deep. Do not cut along the dotted line shown, as this makes the upper lip of the mortise weak and liable to snap off.

- The strut should fit exactly into the mortise, with no gaps visible around the edge. Mark round the strut and then remove it, to check the depth to which it is going into the mortise. Usually it is also possible to see the ‘imprint’ of the strut end on the back of the mortise, which gives an indication of whether the strut is going in to the full depth, or whether it is catching at one side or corner.

- Before finally fitting the strut, brush preservative liberally into and around the mortise, and onto the cut end of the strut. Do not nail the strut.
- Try to find a large and strong stone that will not shatter or fracture, to use as a thrust plate. It should be long enough to extend well to either side of the base of the strut, and deep enough that the strut cannot slip off the bottom. The top of the stone should not protrude above ground level. Widen the slot already made, to take the stone. Some fencers also put a stone underneath to stop the strut slipping off the bottom of the thrust plate. Then using the spade, lever the strut into position so it is jammed tight behind the stone. If the strut won’t fit, dig back a fraction to move the stone back.

Some people prefer to do it the other way around, fitting the strut to the thrust plate, and then knocking the top of the strut sharply down so it ‘clicks’ into place in the mortise. However, this is quite difficult to judge, and it sometimes breaks the top edge of the mortise. The former method is recommended. - Test the strut by kicking against the bottom, and by trying to lift it out. It should not move at all sideways, and it should require a lot of heaving to lift it upwards. If it comes out it’s not good enough. Start again using a bigger rock as a thrust plate, or by wedging the existing one with extra stones.
- Backfill the hole, tamping the soil down with a punner. Leave the surface slightly higher than the surround, to prevent water gathering around the base of the strut.
If stones are not available, a wooden ‘stob’ made from a stake cut in half can be used. The usual method of fixing this is to knock the stob in at an angle while the strut is held in place. Round stobs require a notch in the base of the strut, to stop it slipping off. This method must be used if a retaining wire is being fitted.

An alternative way of using a wooden stob is to dig a trench across the line of the fence, and lay the stob horizontally. This can be placed carefully in position, rather than relying on hitting it just right, but is not suitable for use with a retaining wire. 


