Principles
When building or rebuilding a wall, there are eight basic principles that you should try to apply to the placing of each stone. These points are explained in more detail later in this chapter.
- Place the biggest stones at the bottom, except for throughs and topstones.
- Place the stone lengthways into the wall, and avoid ‘tracing’ it, that is placing it with its long axis along the wall.
- As you place each stone, make sure it is touching its neighbours below and to the side for as much of its surface as possible. As your skill develops, you should also achieve good contact within the wall itself.
- Place stones in such a way that you can subsequently build on top and alongside them. Avoid sharply angled tops and faces, and small, sharply angled steps between stones.
- Taper the wall, following the correct batter for the type of stone.
- Break, or cross, the joints.
- Place the stones so that they sit solidly on those below, with a minimum of wedging.
- Set the stones to the true horizontal, rather than with the slope. This keeps the weight and forces within the wall perpendicular, reducing the potential for movement.
Wallers will continually disagree over the relative merits of these points. The order above is an attempt at prioritisation, but this will vary with factors such as stone type and the interaction of the principles. For example, when using small stone which has little length to place into the wall, the crossing of joints becomes more important.
At first it might seem that there’s a lot to worry about, but even the best wallers rarely achieve all the principles for every stone. The key is to place each stone to meet as many of these principles as possible, without seriously failing any one of them, or compounding the failures. For example, tracing the odd stone is unlikely to seriously weaken a wall, but tracing a stone that is also out of batter will. Similarly, grouping traced stones alongside or on top of each other can create a serious weakness, as can creating a running joint with a traced stone.
Finally, there is a ninth principle, not related to individual stones, but equally important. Keep the middle full.
Layering
Dry stone walls are built up in more or less regular layers, not only for appearance, but to ensure symmetry and stability along their length and across the section of the wall. Layering differs from coursing, in that although all walls are built in layers, those in a coursed wall are far more regular, with the stones in any one layer of more or less the same height. In all walls, the layers are graded with the biggest stones at the bottom, and the smallest at the top.
It is usually best to place each layer along the entire section, before beginning on the layer above. If you do this, and at the same time always look for the biggest remaining stone to use next, you should have no trouble grading the courses.
Build up both faces at the same time, and keep them well filled in between. Never put stones on succeeding courses until the wall below is steady and complete.
Grading
Place the biggest stones at the bottom, except for throughs and topstones. There are three reasons for this rule.
- Small stones on top of big stones are less likely to slip or settle badly.
- It is much less tiring and hazardous to use the big stones near the base, than to heave them up to waist or chest height.
- Stones should be placed with their long edges into the wall, and to do this, it is necessary to use the big stones lower down where the wall is widest.
The following points should help you grade the layers properly:
- Determine the height of each layer by the biggest stones you plan to use in it, discounting the occasional misfits, which must be accommodated in more than one layer. Try to keep to this height along the whole layer, but differences inevitably occur where the wall is not strictly coursed. In the lower layers, it is best to try and leave large steps of 3″ (75mm) or more, rather than small ones, to avoid the excessive use of small stones low in the wall. Where there is suitable stone available, another alternative is to use stones with complementary slopes to allow the secure setting of a slightly larger stone on the next layer.
Take extra care to level up the layers on which throughs and topstones are to be placed. You may have to use thin stone to make good any small discrepancies in the heights of stones in these layers.

- The regularity of grading which can be achieved depends on the type of stone available.
- At any given point, use stones of roughly equal size and weight for each face of the wall. If you can’t always follow this rule, avoid putting all the biggest stones on one side of the wall in any given length, or it may settle unevenly across its section.

- If you have to mix big stones with small ones to complete the layer, try to space the bigger stones fairly evenly along both faces of the layer, rather than putting them altogether, which not only looks bad, but might cause the wall to settle unevenly along its length.


Placing the stones
Use both hands to pick up and place stones, other than fillings or very small stones. This is safest, and gives you the best sense of shape. After positioning each stone, test how easy it is to shift it with a downward and outward pressure from your hands. It should be steady, with succeeding courses making it sit even more firmly.
Place, don’t drop, the stone on the wall. This is better for the wall and for your fingers. See Safety, equipment and organisation – General safety considerations for health and safety advice.
When working alone, build from both sides at first, stepping back and forth over the wall as necessary. When this becomes difficult, you may be able to adjust stones in the opposite face by putting one hand on a stone on the far face, and leaning over. This is better than stepping on the wall to cross it, which tends to disrupt both faces.
Once the wall is a few feet high, you can either work mainly from one side or continue to cross over or walk around it at frequent intervals. For beginners, it is best to work equally from each side, concentrating on the near face each time. Where you have to cross over the wall, as when rebuilding between existing sections, step carefully on a face stone on the far side, and check afterwards to be sure it has not been displaced. Do not put your weight on the filling.
Note the following:
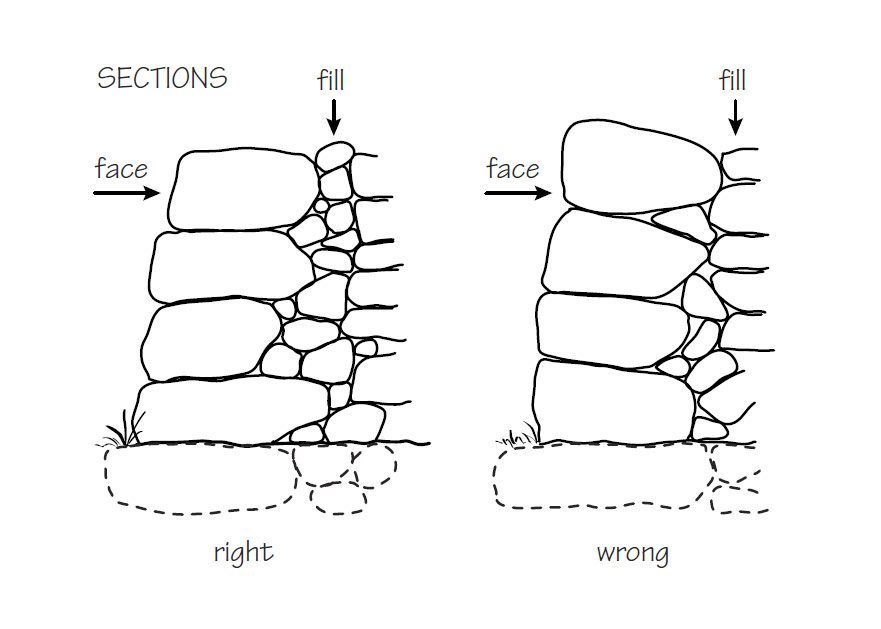
- Place each face stone so that its top is either level, or slopes slightly upwards towards the centre of the wall.
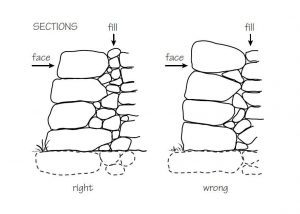
Never place the stones so they slope downwards towards the centre, since they tend to tilt more and more as the filling below them settles. This brings their weight and that of the stones above them more and more onto the filling, rather than onto the face stones and foundations below. Inward-tilting stones also feed rainwater into the vulnerable heart of the wall, increasing the likelihood of frost damage. Both processes are likely to cause the wall to eventually collapse inward. - Try to place each face stone with a flat side downward so that it is solidly bedded. Even if this means that the upper surface is rounded, it is usually easy enough to create a good bed for the next layer by placing small flattish stones to either side. If you put the round side downward, the area in contact with the stone below is small, and it may be hard to wedge the stone so that it sits firmly.

- Don’t place stones so that they act as down-thrusting wedges.

This is especially tempting when using irregular blocks of limestone, but it tends to force neighbouring stones apart and weakens the wall. - Given the above restrictions, place each stone so that the flattest edge, or the one most nearly perpendicular to the bed is outermost, to form the face of the wall.
 Each stone’s face should be in alignment with the wall’s batter. When building to a guideline, the stone should be almost touching or just brushing the line, but not displacing it or a bulge will result. Where you are setting stones below the height of a guideline, look down from the guideline to the last layer to get the precise position.
- If a stone is too long to set into the wall, and will not sit firmly when traced, then you may need to break it up into smaller pieces.
- Avoid placing stones so that they project beyond the general face of the wall, if possible. Where this has to be done with large stones which would not otherwise sit properly, make sure they are really solid, as shown left.

The middle diagram shows a stone which should never be placed sticking out of the wall, because it will be forced down and out by the stones on top. Place this type of down curved stone further back, so that it is driven strongly against the stone below, as shown right. - Most sedimentary and metamorphic rocks have a definite grain along the bedding planes or lines of foliation. Try to place face stones so that the grain runs horizontally, even if the upper surface is tilted because of this. Stones best resist weathering this way.

- Placing the smooth outer surface of a stone in the face not only looks good, but also tends to deter climbers, while irregular inner edges bind best with the fillings.
- As your walling skills develop you should try to achieve a good fit between stones inside the wall.


Wedging
Ideally a stone should always sit firmly without rocking, but this is not always possible. If necessary, it can be secured with a small wedge-shaped stone tucked underneath and behind it.
Wedges are also useful to raise face stones at the back, to ensure that the top surfaces are level or slightly tipped down and out. Wedges may be any size and shape, as long as they have a sharp angle to fit snugly in position. Test the face stone after wedging to check that it doesn’t rock back and forth, or loosen when weighted down. If you need to break up big stones to get suitable wedges, make sure you have plenty left for the wall face.

Keep wedging to a minimum, and always use one wedge the right size rather than several thinner wedges, which are more likely to become displaced or settle. Also be careful not to tip stones so much that their surface contact with the stone below is diminished.
Fitting stones together
Wallers talk about ‘tight’ and ‘slack’ walls or faces. A tight face is one where the stones are fitted together closely with few gaps between the stones. A slack face has plenty of gaps. A tight face not only looks good, but is stronger than a slack face because there is more friction between the stones, and less potential for movement. The degree of tightness is often relative to the size and shape of building stone, so a wall of small, regular stone will naturally be tighter than one built of large boulders.
- Stand back and check the wall after each layer. You should be able to see if part of the face is too slack, or if a joint (see below) is developing, and can then rectify the problem before it is too late.
- When finding a stone to fit against an awkwardly shaped neighbour, it may be easier to feel the needed shape than to estimate by eye. You may find it helpful to shuffle the stone around in your hands while looking at the spaces in the wall, to get a better idea of the required fit.
- Use the best stones for the face. Awkward or misshapen stones can go in the centre. Break them up only if they are too big to use whole for filling, or if they are too smooth to ‘bite’. Many wallers will tell you that ‘every stone has a home’, and occasionally you can get them to admit that sometimes this home might be underneath a well placed sledgehammer blow.
- Normally work in sequence, placing one stone and then its immediate neighbour, continuing along the layer ensuring each stone touches the stone below and to the side. An alternative is to work on a short section, of about 3-6′ (1-2m). Pick up a likely stone and look to see where it will fit in that section. If it doesn’t fit first time, instead of discarding it or carrying it up and down the wall looking for the best place, try it in different ways in the immediate area where you are working. This saves time and effort. You should be able to get a good fit with the stones below, but you need to be careful not to leave gaps which are of a size or shape which are likely to be difficult to fill. With experience this becomes easier to judge, and most stones will be placed correctly at the first try.
Joints
An important rule is to cross or break the joints, to achieve a good bond between layers. This rule is often expressed as the waller’s prayer: ‘One on two and two on one’. Properly crossed joints, as in a brick wall, distribute the pressure from each stone downward and outward evenly over the entire wall. Uncrossed joints channel this pressure into lines of weakness which show up as seams that widen as the wall settles. This weakness increases geometrically for each additional uncrossed joint in vertical line.

Even an expert waller must sometimes leave one uncrossed joint to make the stones sit firmly, or to bring up the course between two taller stones, but the hallmark of hasty or careless walling is a seam of two, three or even four uncrossed joints, usually referred to as a ‘running joint’.
In the ideal wall, the crossing would be very regular and even, and not just ‘one on two and two on one’, but ‘half on one and one on half’. In practice this rarely happens, but it is important to bear in mind as joints which are minimally crossed are effectively running joints.

Filling
Keep the middle full, or as the Scots say, ‘keep your heart up’. Filling, packing or hearting is an invisible but essential component of every dry stone wall. Without it, the face stones settle inward and the wall collapses in the centre. In this respect it also plays an important role in securing wedges. If a face stone is wedged, and the wedge moves during settlement, the process of collapse is accelerated. Without good hearting, there is nothing to hold the wedges in place.
Filling should be used at every layer to help bind and steady the face stones, provide drainage, and create a base for the layers above.
- Use solid rocks, not topsoil, earth, sand or fine gravel. Fine material washes or settles out of the wall.
- The size of the filling stones depends on the type of face stones. Walls of irregular shaped stones should have larger filling, whereas walls of regular stone can have filling of coarse gravel, at least 1″ (25mm) diameter.
- Filling should be angular to bind properly under pressure. Rounded, water-worn stone, particularly of small size, should not be used, as the stones tend to slide on one another, and the overall effect is like trying to build a solid wall on a bed of ball-bearings. Split water-worn and other too regular filling with a walling hammer before using them.
- Convert very big or awkwardly shaped stones into filling only if you know you have plenty of face stones. The shaping of face stones will create some filling.
- Use large filling between the foundation stones and in the lower layers, and smaller ones in the upper layers. Filling usually grades down less quickly than the face stones, so that by the top layer, the filling may be almost as big as the face stones.
- Place filling in position carefully, one stone at a time. Do not throw or shovel them in haphazardly, since this produces a poorly consolidated centre, and also tends to include soil with the fill, which eventually washes out of the wall. This aim is not to get the wall up quicker by using filling, but to provide a sturdy structure that tightens as it settles.
- Start placing the filling from the face stones towards the centre of the wall. Use smaller stones to fill any nooks and crannies between the face stones, then place larger stones in the bigger voids, trying to find one stone for one space, then fill any smaller gaps which remain.
- Make sure the filling doesn’t dislodge face stones, and that each is held by its neighbours so that it cannot settle or be washed out of the wall.
- Keep the filling at the same height or a little higher than the tops of the face stones in each layer. It is best to add fillings as you work, rather than finishing a layer of face stones and returning to fill in between. Check the completed layer before starting the next one, to see if any low spots need additional filling.