There is a direct relationship between the size of the crown and the stem diameter of the tree. Without sufficient crown to generate food, the stem will remain thin, and growth of the tree will stagnate, resulting in stands of crowded, spindly trees.
If planting has been closely spaced, as advised for quick establishment, the young woodland must be thinned to allow sufficient space for trees to continue to thrive. The old forestry rule is that the stem thickness (dbh) in inches should equal the radius of the crown in feet. For example, a tree with a dbh of 8 inches should have a crown of radius 8 feet, or diameter 16 feet.
Thinning should start about 10 years after planting for trees planted at 2m spacings, with successive thinning operations about every 10 years following. Trees planted at 3m spacings may not need thinning until about 20 years after planting. Table 7b (below) gives the recommended spacings for commercial production of various timber species.Although not directly applicable to mixed amenity woodlands, the table gives a guide to the amount of thinning which may be appropriate.
Felling considerations
The first thinning may require felling trees up to about 10cm (4”) stem diameter, although size will vary greatly according to the site, spacing, species mix and other factors. Some trees may have put on little height or stem growth, having been out-competed by other trees. Other trees, particularly fast-growing species such as willow, may have grown to over 10cm (4”) stem diameter ,and depending on the purpose of the planting, may need thinning out to make space for slower growing, longer lived species.
In commercial crops, thinning requirements will be dictated by commercial considerations.
In addition to the safety points below, refer to those in Chapter 4 – Safety, equipment and organisation.
- Think through carefully all the aspects of the work. This includes not only felling, but also removal of the cut material as necessary.
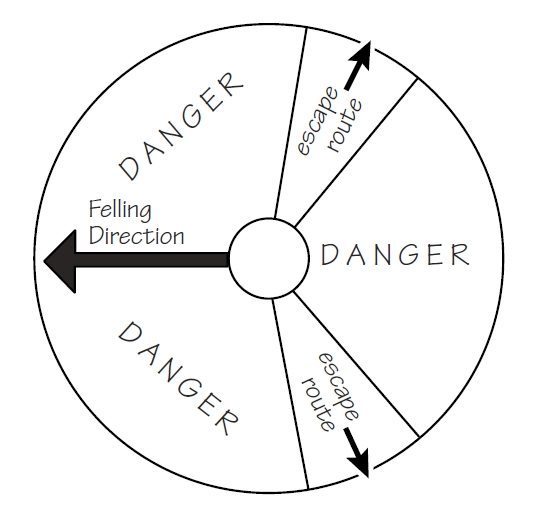
- Study the tree to decide on likely directions of fall. The weight of the crown is a major factor in determining the direction of fall. Make sure that escape routes are cleared of bramble and other obstructions.
- Ensure there are no obstacles, such as stumps or boulders, over which the cut tree may fall, causing the butt end to spring upwards.
- Check for overhead cables.
- Be aware of present or imminent weather conditions. Don’t work in heavy rain or strong wind. Take great care on slopes.
- Put up warning signs or rope off areas and post look- outs in order to keep unauthorised people out of the area.
- Don’t work alone, but ensure that no-one else enters the danger zone while cutting is in progress.
- Keep a safe distance of at least three tree lengths from other thinning operations.
- Unless otherwise directed, leave as low a stump as possible. This is particularly important with slender saplings and coppice shoots. If these are felled with one oblique stroke, the sharply pointed stub that results presents a dangerous hazard.
Thinning and other felling should be done in late autumn and winter, from October to February. at this time the trees are less sappy and are easier to cut and handle than in the growing season.
On wet sites you may have to work in late summer or autumn to minimise soil damage. Avoid work during spring and early summer, which is the main nesting and flowering season.
Normally you can leave the cut stumps untreated, and allow them to produce weak coppice growth. If a clear woodland floor is required for access or to encourage ground flora, treat the cut stumps with herbicide, or dig them out.
Felling small trees
Wear suitable clothing and a protective helmet.
Trees with a stem diameter of about 7.5cm (3”) at the base can be felled by cutting straight through, using either a billhook or a bowsaw. Note that the ‘front’ of the tree is the side on which it is intended to fall, and the ‘back’ is the opposite side.
Bowsaw
The bowsaw is the safest and most versatile felling tool, and is best for most work on small trees.
Crouch or kneel to one side of the tree, in order to saw through from the back.

Make the cut level or angled slightly downward in the direction of fall. Using the full length of the blade, saw with easy relaxed strokes.
If the tree starts to twist, or as it settles back, use your other hand to push it in the direction of fall. Saw faster as the tree falls to minimise the risk of the stem splitting. Keep sawing to sever the stem.
Billhook
As a felling tool, the billhook is best used on light coppice material and multi-stemmed shrubs where a bowsaw is awkward. Don’t wear a glove on the hand holding the tool, but a thick protective glove on the other hand is advisable.
Position yourself to the side of the tree, far enough back to achieve a full swing without endangering yourself. Standing allows a more powerful stroke, but crouching or kneeling may be necessary to avoid obstructions. Unless the tree is leaning heavily, you will be cutting into the front of the tree. Use the billhook one-handed, controlling the descent of the tree with the other hand, placed well up the stem for safety.

Don’t try to cut directly across the grain. For small stems which can be severed with one blow, make a slightly upward-sweeping stroke. Avoid cutting downward, or you will drive the hook into the ground and dull or chip the edge. If the cut results in a sharply pointed stub, trim it immediately.
Cut thicker stems by notching, as shown. Progressively enlarge the notch with downward and upward strokes until you can finish off with an upward stroke. Keep out of the way of the tree as it falls.

Felling larger trees
Trees over 150mm (6”) in diameter should only be felled by experienced workers. See Woodlands – Felling, clearing and extraction for details.