The simplest strained wire fence is a straight fence stretched between two straining posts, with intermediates between. Complex layouts around fields or following boundaries are made up in one of the following ways:
- A series of straight lines between a series of straining posts. As the fence is built, Monkey or similar wire strainers are attached to each straining post in turn, and the wire is strained and fastened off, and may be cut and restarted.
- A single strain of wire, taken around turning posts as necessary. Turning posts are slightly smaller than straining posts, and do not always need struts. Monkey strainers are not used on them, but only on the end straining post. The wire is pulled from there in one go, with the wire running freely around the turning posts. This method is quicker, and saves on materials for fastening off and joining wire, as well as on straining post construction. With longer lengths there is less margin for error, and if a section fails for any reason, the whole length may be affected.
Which of these two basic methods is used will depend on:
- The type of wire being used, and the length of chain on the strainers. The recommended maximum strain length for mild steel wire is 150m. There is no theoretical maximum strain for high tensile wire, so the recommended maximum strain length is determined by the roll length of the wire and the capacity of the strainers. High tensile netting stretches 1.5m in every 100m, so strainers with 1.5m of chain can only tension up to 100m of netting. Boundary strainers, with 6m of chain, are required for tensioning lengths over 100m.
- The length of the wire. Mild steel stock netting is supplied in 50m lengths, and thus distances between strainers of 50 or 100m are ideal, as these avoid having to cut or waste any netting. High tensile netting is supplied in 100m rolls, therefore multiples of 100m are ideal.
- The terrain. It is more difficult to strain netting over dips and hollows, as it distorts. In this case it may be necessary to place a straining post at high and low points, and cut and restrain the netting. Line wires can be strained up or down as necessary, but there is extra strain at the low points, which need increased anchorage.
- Other features. Gateways, junctions with existing fences or walls and other features need to be taken into account.
Turning posts
These should be about 125-150mm (5-6″) diameter, and the same length as the straining posts. Normally the smaller diameter posts of the batch supplied as strainers are used.
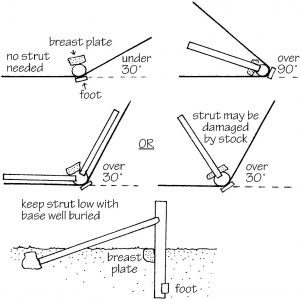
- A turning post is set in a dug hole, normally 1m (3′) deep, in the same way as a straining post. A foot and breast plate is fitted at the bisect of the angle.
- No strut is required for a turner if the angle is less than 30 degrees. Above 30 degrees, either one or two struts can be used. If one strut is used, it should bisect the angle as shown. Keep it low, to try and reduce stock damage. An angle greater than 90 degrees normally has a single strut.
- Fit the strut and thrust plate as described for straining posts.
- The wire is taken around the back of the post, with the wire fastened to a running fit. Two staples can be used, as shown.


Layout
- Put a strainer, turner or large stake (if the batch supplied is of variable size) at the top of any hump or bottom of a hollow.
- All turning and straining posts at low points should have larger than normal feet, to combat the extra upward force on the post.
- If a stake is driven in at a low point, it may need to be tied down. The need for this depends on the steepness of the dip, the amount of strain, the softness of the ground, and the length and diameter of the post. Tie-downs are used more often on high tensile fencing, as fewer posts result in the fence hugging the ground less well than mild steel fencing. Tie-downs are described here.
- Small dips and hollows can be filled in after the fence has been strained. This requires using either turfs, sods of earth or peat, rocks, extra rails or netting. Keep the fence away from any steep banks which could provide a ‘launching off’ place for animals that jump.
Large hollows, gullies and watercourses
In some situations it will not be possible to make a tie-down in a gully:
- If the gully is too steep to hold the fence down securely.
- If the gully is a watercourse for part of the year. Waterlogged marshy ground at the bottom of a gully will also need to be ‘bridged’, as it will be too soft to make a secure tie-down.
Where water levels fluctuate greatly during the year, a water gate should be fitted. This is a barrier which swings up and floats when the stream is in spate, and drops to form a barrier as the water level drops.
Gullies which are permanently dry, or have only a seepage at the most, can have a fixed barrier.

Estimating materials
Walk the fence line, pacing it or measuring it as you go, and make a sketch of the position of all straining posts, turning posts and struts. Mark gateways, and note the need for tie-downs, water gates and barriers. Then using the information given in Chapter 1 – Design and siting, work out the number of intermediates, the length of wire and other fittings required.
